
Large language models (LLMs) like ChatGPT and GitHub Copilot are rapidly…
Introduction and Overview
In custom software development, it’s not uncommon for companies to deprioritize automated end-to-end (E2E) testing1 in order to get to the desired solution as quickly as possible and for as little cost as possible. It’s understandable why this happens, because the initial application doesn’t start out large and complicated. Isn’t unit testing2 good enough? Isn’t a bit of manual testing3 enough to show that the integrated components are working? Why add tens of thousands of dollars to the cost of a new project for something that the user never sees?
At odds with this reasoning is the fact that businesses also value reliability, quality, and customer satisfaction. It might make sense to delay automated E2E testing when the project is in its infancy; however, as soon as an application is deployed to production (and will be for the foreseeable future), it’s time to talk about adding those E2E tests.
End-to-end testing is useful because it provides assurances that the system as a whole, and all of its interconnected components, are working together as expected. This is especially important in web development where parts of the system are out of the developer’s control. Take browser compatibility, for example. Unit testing your Java code will not guarantee that the application will behave the same way across different browsers. Nor will it ensure that dependent systems under another team’s control will not introduce changes that break your own system.
In this article, we’re going to cover how to add E2E tests to a Java 8 application using Cucumber and Selenium WebDriver. Cucumber is currently the most popular tool for behavior-driven development4 for software development companies, and Selenium WebDriver is the most popular tool for web browser automation. Here is a brief highlight of the benefits of using these tools:
- The Cucumber feature definitions are in plain English that can be understood and written in collaboration with your business users. They become “living documentation defining how your software will work.” [Cucumber]
- These feature definitions drive the executable, automated tests. This ensures your software is tested to meet specifications, because the specifications are the tests.
- The Selenium WebDriver tool opens and manipulates a browser window in the same way a user would. It can navigate around a website, clicking buttons, entering text, etc.
- With Selenium used in combination with JUnit5, you can recreate user behavior and assert the expected condition of the web page at any time along the way.
Collaborating with Your Business Users
Let’s talk for a moment about traceability6. How can you be sure that your software requirements are met by the product being delivered? Consider the following snippet. This is a feature (the “living documentation” for your application mentioned above) as written in the Gherkin7 syntax:
Feature: Searching the Zirous website displays relevant results
Background:
Given I use the Chrome browser
And I navigate to the Zirous home page
Scenario: Searching within the menu bar.
When I click the magnifying glass in the header
And I type “Machine Learning”
Then the page title should contain the search input
And the search results should include:
| Machine Learning Spark | Navigating Machine Learning Obstacles |
Feature written in the Gherkin syntax
This is something your business users can read, understand, and even help to write. It clearly defines the expected behavior for the software. You could even hand this to a tester to perform the test manually. However, it can be a little verbose, considering you may need to write dozens of scenarios to fully test a feature. This is where the Scenario Outline comes into play. The next snippet is the same feature written with a Scenario Outline:
Feature: Searching the Zirous website displays relevant results
Background:
Given I use the Chrome browser
And I navigate to the Zirous home page
Scenario Outline: Searching within the menu bar
When I click the magnifying glass in the header
And I type “<Search Input>”
Then the page title should contain the search input
And the search results should include:
| Result A | <Result A> |
| Result B | <Result B> |
Examples:
| Search Input | Result A | Result B |
| Machine Learning | Machine Learning Spark | Machine Learning & AI |
| cloud infra | Cloud Has Your Back | Shroud of the Cloud |
| java development | Landing Your Dream Job | NiFi vs. Kafka… Or Is It? |
Feature written using Scenario Outline
In this way, you can test a multitude of inputs to make sure you’re hitting any edge cases in the application logic. The great thing about Cucumber is that, because these feature documents drive the tests underneath them, they allow you to clearly trace the requirement through to its implementation and subsequent testing.
Before We Get Started
Assumptions About You
For this tutorial, I’m making the following assumptions about you, the java developer:
- You are familiar with Java 8 and Java 8 lambda functions.
- You are familiar with the Maven dependency manager.
- You are familiar with JUnit and how to make assertions.
- You can read the Cucumber or Selenium documentation for details on using all the different features of those libraries
Assumptions About My Setup
Here are the technologies I will be using. You might be using a different IDE or different library versions, but this at least gives you an idea of where I’m coming from with my instructions:
- Windows 10 OS
- IntelliJ IDEA Ultimate 2019.3.4 with these relevant plugins enabled:
- Cucumber for Java (bundled)
- Gherkin (bundled)
- JUnit (bundled)
- Maven (bundled)
- Maven Extension (bundled)
- JDK 1.8.0_171
- Maven Dependencies (you can also find these in the linked repository’s pom.xml file):
- junit 4.11
- Cucumber 4.0.0-alpha-5
- cucumber-java
- cucumber-java8
- cucumber-junit
- selenium-java 6.0.0-RC2
- slf4j-nop 1.7.30 (this is just to appease logging warnings shown by Selenium)
You’ll notice I’m using an alpha version of Cucumber and a release candidate (RC) version of Selenium. These are the latest versions at the time of writing, so I decided to use them despite the fact that they’re not stable releases yet. As with all the dependencies, use discretion and best practice when choosing which versions you’ll use. As long as you keep the major version the same, the code presented in this tutorial should work fine for you.
Assumptions About the Project
For this tutorial, I won’t go into any detail about what kind of web application you’re running. In fact, to simplify this, I’m not even going to put any “Hello World” web application code in place. I’m just going to assume the tests will be run against a running instance of your application.
Specifically, for this demo I’ll be running my tests directly against the Zirous website. We’ll test the search functionality of the website by simulating a user clicking on the magnifying glass in the website header and searching for a given topic. I’ve chosen search terms that should surface information about some of the different solutions that we offer as a software development company.
Step 1: Add dependencies to pom.xml
Create a pom.xml file in the root directory of your project. Copy/paste the following contents into it, and be sure to update any project-specific attributes to match that of your project. Please also upgrade any of the dependencies to the latest matching major version.
<?xml version=”1.0″ encoding=”UTF-8″?>
<project xmlns=”http://maven.apache.org/POM/4.0.0″
xmlns:xsi=”http://www.w3.org/2001/XMLSchema-instance”
xsi:schemaLocation=”http://maven.apache.org/POM/4.0.0 http://maven.apache.org/xsd/maven-4.0.0.xsd”>
<modelVersion>4.0.0</modelVersion>
<groupId>your.group.id</groupId>
<artifactId>your-artifact-id</artifactId>
<version>1.0-SNAPSHOT</version>
<name>Your Project Name</name>
<url>https://www.your-site.com</url>
<properties>
<junit.version>4.11</junit.version>
<selenium.version>4.0.0-alpha-5</selenium.version>
<cucumber.version>6.0.0-RC2</cucumber.version>
</properties>
<dependencies>
<dependency>
<groupId>junit</groupId>
<artifactId>junit</artifactId>
<version>${junit.version}</version>
<scope>test</scope>
</dependency>
<dependency>
<groupId>org.seleniumhq.selenium</groupId>
<artifactId>selenium-java</artifactId>
<version>${selenium.version}</version>
<scope>test</scope>
</dependency>
<dependency>
<groupId>io.cucumber</groupId>
<artifactId>cucumber-java</artifactId>
<version>${cucumber.version}</version>
<scope>test</scope>
</dependency>
<dependency>
<groupId>io.cucumber</groupId>
<artifactId>cucumber-java8</artifactId>
<version>${cucumber.version}</version>
<scope>test</scope>
</dependency>
<dependency>
<groupId>io.cucumber</groupId>
<artifactId>cucumber-junit</artifactId>
<version>${cucumber.version}</version>
<scope>test</scope>
</dependency>
<!– https://mvnrepository.com/artifact/org.slf4j/slf4j-nop –>
<!– This was added to silence some logging warnings from Selenium. –>
<dependency>
<groupId>org.slf4j</groupId>
<artifactId>slf4j-nop</artifactId>
<version>1.7.30</version>
<scope>test</scope>
</dependency>
</dependencies>
<build>
<pluginManagement>
<plugins>
<plugin>
<groupId>org.apache.maven.plugins</groupId>
<artifactId>maven-compiler-plugin</artifactId>
<version>3.8.1</version>
<configuration>
<encoding>UTF-8</encoding>
<source>1.8</source>
<target>1.8</target>
</configuration>
</plugin>
</plugins>
</pluginManagement>
</build>
</project>
Contents of the pom.xml file
Once that’s ready, run the mvn compile command, which will (among other things) attempt to locate and download the dependencies. If there are any errors with the dependencies, correct them before proceeding.
Step 2: Install WebDriver(s)
The web drivers used by Selenium do not get installed with Maven. They also are very dependent on which browser (and which browser version) you are using. For each browser you want to test with, you need to find the correct web driver, download it, move it to a relevant location on your file system, and then eventually tell Selenium where to find it. Let’s start with getting it in the right place on your computer. For this tutorial, I’ll cover three common browsers: Google Chrome, Mozilla Firefox, and Microsoft Edge.
Google Chrome (Chrome Driver)
- Find your browser version: From the menu, click Help → About Google Chrome
- Download the appropriate binary from https://chromedriver.chromium.org/getting-started
- Unzip the exe file, and move it to somewhere more permanent than the Downloads folder (I chose to move it to “C:\Program Files (x86)\Google\Chrome\chromedriver.exe”)
Mozilla Firefox (Gecko Driver)
- Find your browser version: From the menu, click Help → About Firefox
- Download the appropriate binary from https://github.com/mozilla/geckodriver/releases/
- Unzip the exe file, and move it to somewhere more permanent than the Downloads folder (I chose to move it to “C:\Program Files\Mozilla Firefox\geckodriver.exe”)
Microsoft Edge (Edge Driver)
- Find your browser version: From the menu, click Help and feedback → About Microsoft Edge
- Download the appropriate binary from https://developer.microsoft.com/en-us/microsoft-edge/tools/webdriver/
- Unzip the exe file, and move it to somewhere more permanent than the Downloads folder (I chose to move it to “C:\Program Files (x86)\Microsoft\Edge\msedgedriver.exe”)
Step 3: Add your first feature
If you’d like, you can copy and paste one of the features given above to get started; however, the Gherkin syntax is pretty simple, so you might as well take 5 minutes to look it over and then write a feature for your own project.
The feature file should be placed in the “src/test/resources/features” directory, as shown below.

Step 4: Add your first JUnit test
Your JUnit test files end up being fairly short, because all the actual assertions are performed in the Cucumber step definition files. Later, we’ll add some additional logic to facilitate Selenium setup/teardown. The important thing to notice here are the annotations at the top of the class indicating it will be run with Cucumber and pointing it to the feature(s) it will be using.
import io.cucumber.junit.Cucumber;
import io.cucumber.junit.CucumberOptions;
import org.junit.runner.RunWith;
@RunWith(Cucumber.class)
@CucumberOptions(features = {“classpath:features/SiteSearch.feature”})
public class SiteSearchTest {
}
Basic (though not yet complete) JUnit test definition
We’re going to add a few small changes to this test later when we set up Selenium.
Step 5: Add step definitions for your feature
Step definitions are the actual code implementation of your business user-friendly feature files. They’re written as java classes, and each step definition file should live in the same folder (or in a child folder) of the JUnit test that will be using it. This helps the test find any associated step definitions.

For the most part, I’ll let the code speak for itself; however, I will offer the following points to pay attention to:
- If you’re building a step definition file from scratch, note that the class must implement the io.cucumber.java8.En interface. Otherwise, nothing will work. This can be an overlooked detail when you first get started.
- The SiteSearchTest.getDriver(…) method will be discussed in more detail later, but basically we’ll implement some wrapper functionality around setting up the Selenium web driver.
- The business user-friendly features are captured by regular expressions in the lambda functions. Any matching groups (set off by parenthesis in the expression) result in one or more input parameters to the lambda function.
- You often need to add Selenium “waits” before interacting with or asserting something on the page, because the web driver can move so fast that the element may not have loaded yet. For example, we need to wait for the search results to populate on the page before we can test to see if they contain what we expect.
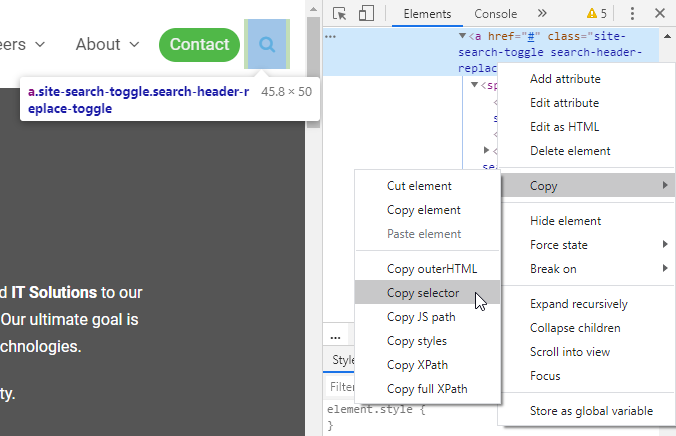
- I mostly use the By.cssSelector(…) locator for finding elements on the HTML web page. An easy way to grab these in the browser is as follows:
- Open the developer tools in your browser (F12).
- Locate the HTML element you want to refer to in your code (CTRL + SHIFT + C).
- Right click on the element in the DOM8 and click Copy → Copy selector.
- Paste that value into your By.cssSelector(…) method.
Here’s the code for our step definitions file:
import io.cucumber.datatable.DataTable;
import io.cucumber.java8.En;
import org.openqa.selenium.By;
import org.openqa.selenium.Keys;
import org.openqa.selenium.WebDriver;
import org.openqa.selenium.WebElement;
import org.openqa.selenium.interactions.Action;
import org.openqa.selenium.interactions.Actions;
import org.openqa.selenium.support.ui.ExpectedConditions;
import org.openqa.selenium.support.ui.WebDriverWait;
import java.time.Duration;
import java.util.List;
import java.util.Map;
import java.util.Objects;
import java.util.stream.Collectors;
import static org.hamcrest.CoreMatchers.hasItem;
import static org.junit.Assert.assertEquals;
import static org.junit.Assert.assertThat;
public class SiteSearchStepDefs implements En {
static final String ZIROUS_URL = “https://www.zirous.com/”;
WebDriver driver;
private String searchInput;
public SiteSearchStepDefs() {
Given(“^I use the Chrome browser$”, () ->
driver = SiteSearchTest.getDriver(SeleniumTest.Browser.CHROME));
Given(“^I navigate to the Zirous home page$”, () ->
driver.get(ZIROUS_URL));
When(“^I click the magnifying glass in the header$”, () -> {
By locator = By.cssSelector(“#menu-main-menu > li.search-toggle-li.wpex-menu-extra > a”);
_wait(2L).until(ExpectedConditions.elementToBeClickable(locator));
driver.findElement(locator).click();
});
When(“^I type \”([^\“]*)\”$”, (String input) -> {
searchInput = input;
By locator = By.cssSelector(“#searchform-header-replace > form > label > input”);
_wait(2L).until(ExpectedConditions.elementToBeClickable(locator));
Actions builder = new Actions(driver);
Action inputAction = builder
.click(driver.findElement(locator))
.sendKeys(input)
.pause(Duration.ofMillis(250L))
.sendKeys(Keys.ENTER)
.build();
inputAction.perform();
});
Then(“^the search results should include:$”, (DataTable expected) -> {
Map<String, String> mapOfExpected = expected.asMap(String.class, String.class);
List<String> expectedArticleTitleList = mapOfExpected.values()
.stream()
.filter(Objects::nonNull)
.collect(Collectors.toList());
By locator = By.className(“search-entry-header-title”);
_wait(10L).until(ExpectedConditions.numberOfElementsToBeMoreThan(locator, 0));
List<String> actualArticleTitleList = driver.findElements(locator)
.stream()
.map(WebElement::getText)
.collect(Collectors.toList());
expectedArticleTitleList.forEach(expectedArticleTitle -> {
assertThat(actualArticleTitleList, hasItem(expectedArticleTitle));
});
});
Then(“^the page title should contain the search input$”, () ->
assertEquals(“You searched for “ + searchInput + “ | Zirous”, driver.getTitle()));
}
private WebDriverWait _wait(long timeoutSeconds) {
return new WebDriverWait(driver, Duration.ofSeconds(timeoutSeconds));
}
}
Contents of SiteSearchStepDefs.java
Step 6: Add setup logic for Selenium WebDriver
Finally, let’s encapsulate all the driver setup logic in a single class that we can have our JUnit test classes extend. This will promote code reuse and keep our Test and StepDef classes clean. It also uses a static driver variable for all tests, so this setup probably won’t work if you plan to run tests in parallel. Don’t forget to update the file paths to wherever you chose to place your web drivers.
import org.openqa.selenium.PageLoadStrategy;
import org.openqa.selenium.WebDriver;
import org.openqa.selenium.chrome.ChromeDriver;
import org.openqa.selenium.chrome.ChromeDriverService;
import org.openqa.selenium.chrome.ChromeOptions;
import org.openqa.selenium.edge.EdgeDriver;
import org.openqa.selenium.firefox.FirefoxDriver;
import java.io.File;
import java.util.logging.Level;
import java.util.logging.Logger;
public class SeleniumTest {
private static final String CHROMEDRIVER_PATH = “C:\\Program Files (x86)\\Google\\Chrome\\chromedriver.exe”;
private static final String FIREFOXDRIVER_PATH = “C:\\Program Files\\Mozilla Firefox\\geckodriver.exe”;
private static final String EDGEDRIVER_PATH = “C:\\Program Files (x86)\\Microsoft\\Edge\\msedgedriver.exe”;
enum Browser {CHROME, FIREFOX, EDGE}
private static WebDriver driver;
private static Browser currentBrowser;
/*
Make sure you install the drivers in the appropriate locations before running these tests.
Alternatively, you can install them where you want and just set the System properties before
running the tests.
*/
static {
initChromeDriverProperties();
initFirefoxDriverProperties();
initEdgeDriverProperties();
}
public static WebDriver getDriver() {
return driver;
}
public static WebDriver getDriver(Browser browser) {
if (null != driver) {
if (browser == currentBrowser) {
return driver;
}
driver.quit();
}
currentBrowser = browser;
switch (browser) {
case CHROME:
// https://stackoverflow.com/questions/48450594/selenium-timed-out-receiving-message-from-renderer
ChromeOptions options = new ChromeOptions();
options.addArguments(“start-maximized”);
options.addArguments(“enable-automation”);
options.addArguments(“–no-sandbox”);
options.addArguments(“–disable-infobars”);
options.addArguments(“–disable-extensions”);
options.addArguments(“–dns-prefetch-disable”);
options.addArguments(“–disable-dev-shm-usage”);
options.addArguments(“–disable-browser-side-navigation”);
options.addArguments(“–disable-gpu”);
//options.addArguments(“–headless”); // only if you are ACTUALLY running headless
options.setPageLoadStrategy(PageLoadStrategy.NORMAL);
driver = new ChromeDriver();
break;
case FIREFOX:
driver = new FirefoxDriver();
break;
case EDGE:
driver = new EdgeDriver();
break;
default:
throw new IllegalArgumentException(“Must supply a supported Browser type!”);
}
return driver;
}
private static void initChromeDriverProperties() {
if (System.getProperty(“webdriver.chrome.driver”) == null && new File(CHROMEDRIVER_PATH).exists()) {
System.setProperty(“webdriver.chrome.driver”, CHROMEDRIVER_PATH);
}
if (System.getProperty(“webdriver.chrome.driver”) != null) {
System.setProperty(ChromeDriverService.CHROME_DRIVER_SILENT_OUTPUT_PROPERTY, “true”);
Logger.getLogger(“org.openqa.selenium”).setLevel(Level.OFF);
} else {
System.err.println(“WARNING: Cannot locate Chrome WebDriver!”);
}
}
private static void initFirefoxDriverProperties() {
if (System.getProperty(“webdriver.gecko.driver”) == null && new File(FIREFOXDRIVER_PATH).exists()) {
System.setProperty(“webdriver.gecko.driver”, FIREFOXDRIVER_PATH);
}
if (System.getProperty(“webdriver.gecko.driver”) == null) {
System.err.println(“WARNING: Cannot locate Firefox (gecko) WebDriver!”);
}
}
private static void initEdgeDriverProperties() {
if (System.getProperty(“webdriver.edge.driver”) == null && new File(EDGEDRIVER_PATH).exists()) {
System.setProperty(“webdriver.edge.driver”, EDGEDRIVER_PATH);
}
if (System.getProperty(“webdriver.edge.driver”) == null) {
System.err.println(“WARNING: Cannot locate Edge WebDriver!”);
}
}
}
The base SeleniumTest class to be extended by all JUnit tests using Selenium
The last thing we need to do is to update our JUnit test to extend the SeleniumTest class. We also add a JUnit @AfterClass method to perform cleanup actions with the web driver.
@RunWith(Cucumber.class)
@CucumberOptions(features = {“classpath:features/SiteSearch.feature”})
public class SiteSearchTest extends SeleniumTest {
@AfterClass
public static void afterAll() {
getDriver().quit();
}
}
Updated version of our SiteSearchTest class
Running the Tests
It’s likely the IDE you’re using has built-in capabilities for running JUnit tests in a Maven project. If not, however, you can run the tests using the mvn test command from the command line. Below are my test results after running in IntelliJ IDEA:

Conclusion
At this point, you have successfully set up some basic end-to-end testing for a project using Java 8, JUnit, Cucumber, and Selenium WebDriver. Congratulations! There are many more features of Cucumber and Selenium to explore while writing your tests, but the major hurdles have now been cleared. Application development must include robust testing to ensure product quality, and by adding end-to-end testing you have taken a step in the right direction for long-term success. If Zirous can be of any assistance, please don’t hesitate to drop us a line! We have a long history of delivering value to clients to help make their organizations successful, and we would love to help you achieve your goals as well.
NOTE: All code mentioned in this tutorial can be found in the following GitHub repository: https://github.com/KrashLeviathan/selenium-cucumber-demo
Resources
1 End-to-End Testing is a type of testing in which business processes are tested from start to finish under production-like circumstances. [ISTQB Glossary]
2 Unit Testing (or Component Testing) is a test level that focuses on individual hardware or software components. [ISTQB Glossary]
3 Manual Testing is a type of software testing where testers manually execute test cases without using any automation tools. (https://www.guru99.com/manual-testing.html)
4 A collaborative approach to development in which the team is focusing on delivering expected behavior of a component or system for the customer, which forms the basis for testing. [ISTQB Glossary]
5 JUnit is a unit testing framework for the Java programming language. [Wikipedia]
6 Requirements traceability in particular, is defined as “the ability to describe and follow the life of a requirement in both a forwards and backwards direction (i.e., from its origins, through its development and specification, to its subsequent deployment and use, and through periods of ongoing refinement and iteration in any of these phases)”. [Wikipedia]
7 Gherkin is the language that Cucumber uses to define test cases. It is designed to be non-technical and human readable, and collectively describes use cases relating to a software system. [Wikipedia]
8 Document Object Model – In this case, I’m referring to the expandable tree of HTML elements in the browser developer console.
Related Posts


Comments (0)